Howard van der Wal talks tactics and tells tales from his successful Final Fantasy VII campaign
I bought my first copy of Final Fantasy VII back in 1997. I was enticed by the artwork, but had never participated in the world of RPGs before.
After multiple failed attempts to beat the game due to save loss, I beat it in the trying year of 2020. Being terrible at videogames, beating any game, let alone an RPG, makes my day!
All information and images were sourced from the Final Fantasy 7 Wiki and SamuraiGamers.
NB: There will be heavy spoilers throughout.
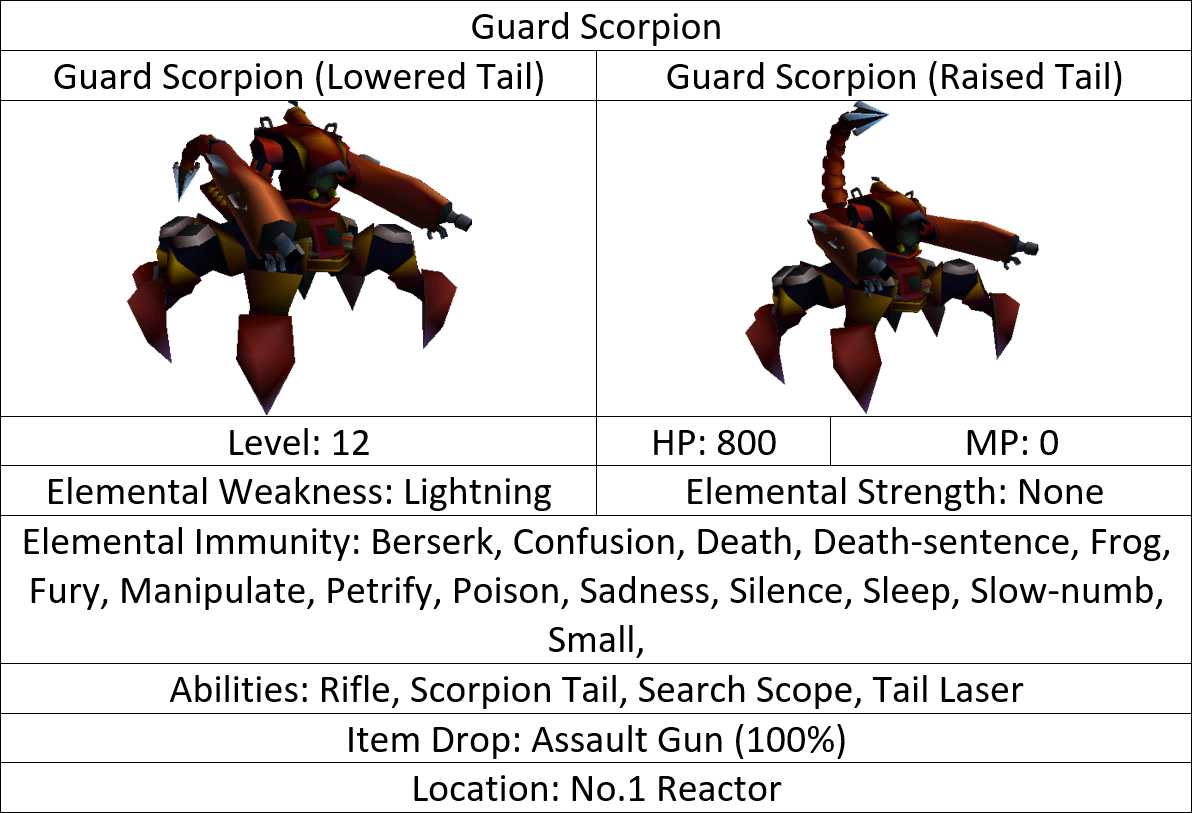
Battle #1 – Guard Scorpion in Mako Reactor 1
Fighting this boss recently brought me back to when I first fought it back in 1997. Being a child at the time, I constantly mashed the attack button and was always surprised why my party got wiped.
During the fight, the boss has two stances: ‘Lowered tail’ and ‘Raised tail’. With ‘Lowered tail’, the boss attacks the player with ‘Rifle’ and ‘Scorpion Tail’ and selects its targets using the ability ‘Search Scope’.
‘Raised tail’ sets the boss into a counterattack state, where if the player attacks the boss, it will use its devastating ‘Tail Laser’ ability.
When in ‘Raised tail’, I defend. In ‘Lowered tail’, I attack with Cloud’s ‘Lightning’ for high elemental damage and Barret’s ‘Gatling Gun’. Both characters were at Level 6, so had no trouble with the Level 12 boss.
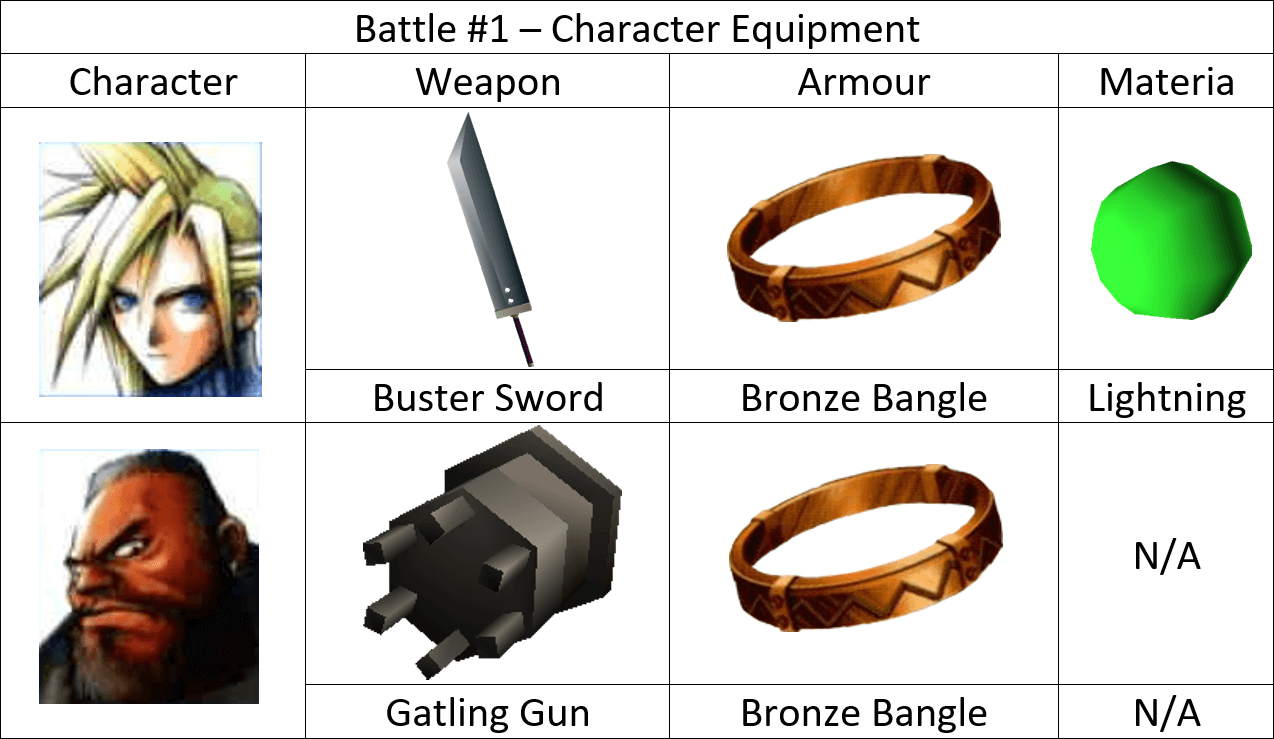
Placing a spellcaster or long-range specialist like Barret in the Back Row of your party has them take less damage, whilst dealing damage with long-range attacks. Characters like Cloud and Tifa who use melee weaponry are best placed in the front row, otherwise they receive an attack deficit.
All-in-all, a fun boss with an iconic art design that eases the player into the game, teaching them the basics of the combat.
Battle #2 – Reno in Sector 7
Out of all the characters in Final Fantasy 7, Reno is by far my favourite. His design is so cool with his black suit, goggles, dyed red hair, attitude and Electro-Mag Rod all add up to make him such a badass. This guy takes people out in style.
The friend/foe relationship you have with him (especially when you spoil his and the Turks’ vacation in the Wutai Materia Hunter Side Quest), help to make him memorable.
A personal favourite is the battle with Reno at the top of the Sector 7 pillar.
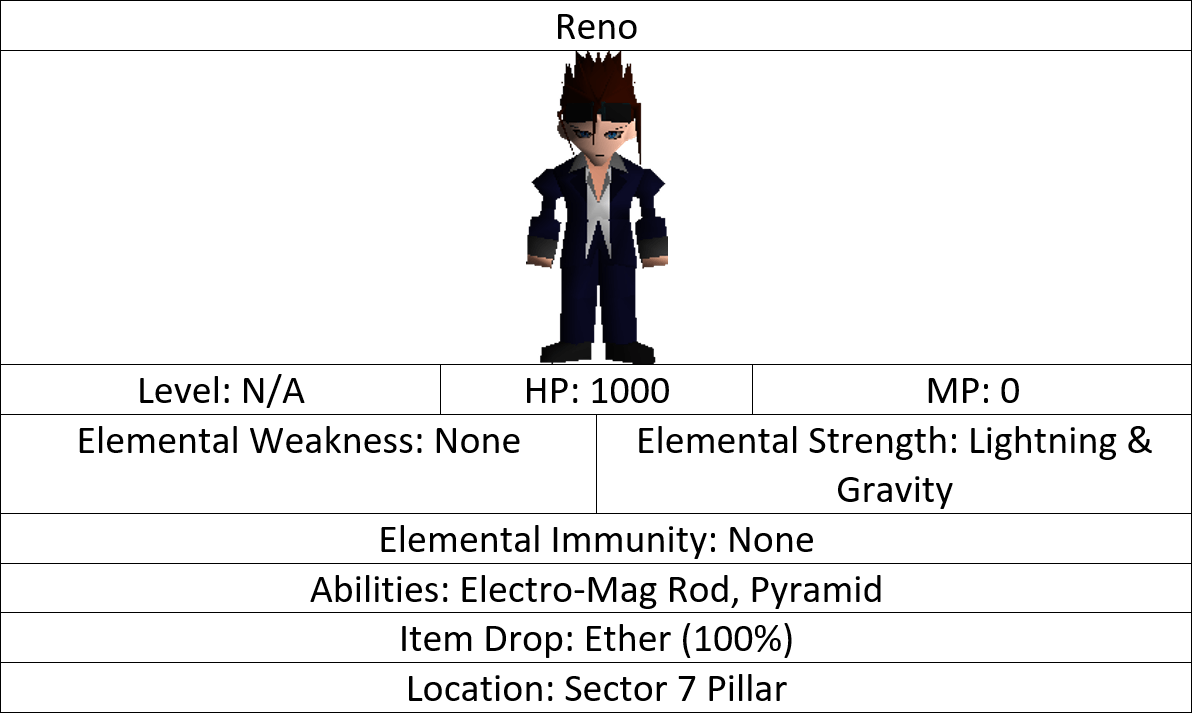
His abilities are ‘Electro-Mag Rod’, which inflicts Lightning elemental damage and ‘Paralysis’ to one party member.
Another ability he possesses is the use of ‘Pyramid’, which places one party member inside a translucent pyramid and renders them unable to attack.
Attacking party members with the pyramid around them removes it. Refrain from using Lightning and Gravity-based attacks) on Reno, as these only cause 50% of potential damage.
Years ago, he placed all my party into pyramids (I didn’t know how to target party members then) and was so frustrated at being wiped constantly!
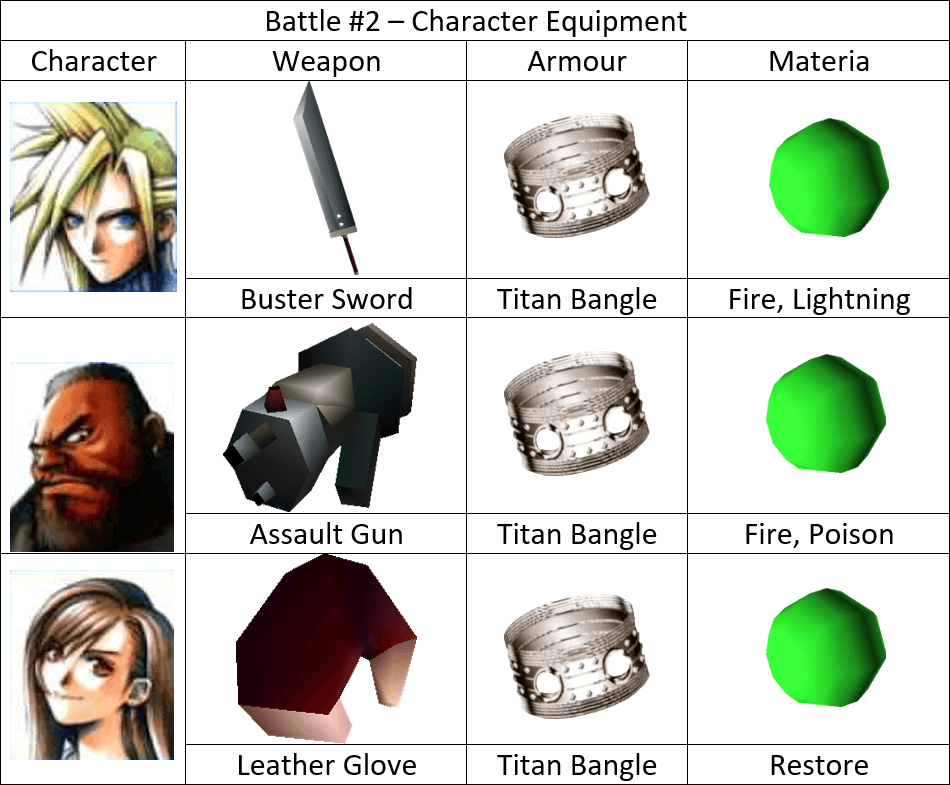
Battle #3 – Midgar Zolom in the Marshes
After leaving Midgar, the next place you go is Junon Harbour, made accessible via the Mythril Mines. Before that, you must pass through the Marshes.
The Marshes are patrolled by the infinitely respawning Midgar Zolom – a formidable serpent based on the World Serpent from Norse mythology.
The boss, similar to the Guard Scorpion, has two stances: ‘Sitting’ and ‘Standing’. In its ‘Sitting’ form, the Zolom has two attacks – ‘Bite’ and ‘Change’ (allowing the boss to swap between its two forms).
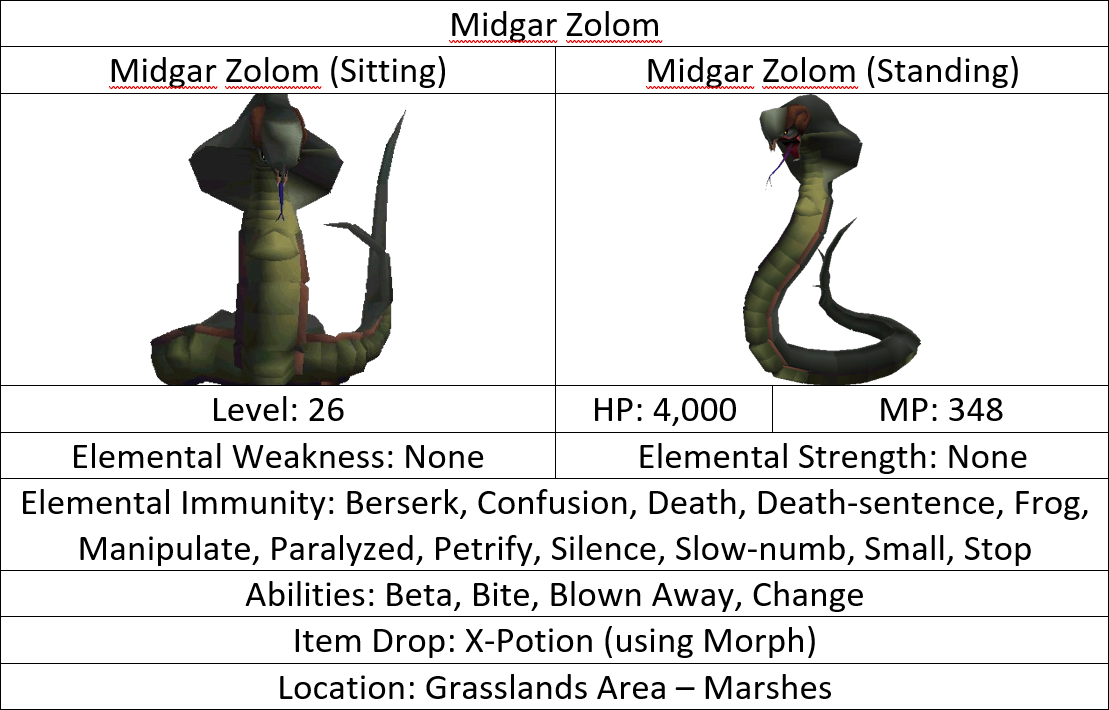
While ‘Standing’, the boss has access to ‘Bite’, ‘Beta’ and ‘Blown Away’. With the ‘Beta’ Enemy Skill, it can one-shot your party unless you are significantly levelled up.
It is possible to learn ‘Beta’ if one party member has the ‘Enemy Skill’ Materia and doesn’t die from the attack after Zolom uses it.
‘Blown Away’ removes, but does not kill a party member from the battlefield.
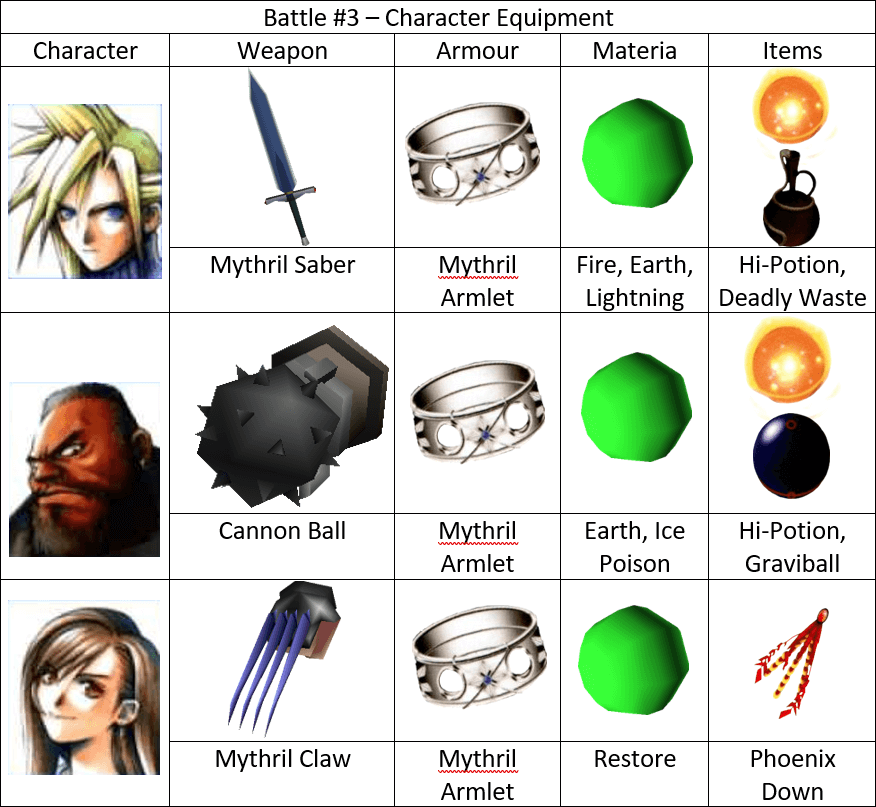
With ‘Hi-potions’ and ‘Phoenix Downs’ (buy plenty at Kalm beforehand), my party was able to survive every battle.
Attacking the Zolom into ‘standing’ state (‘Deadly Wastes’ with 96 damage and ‘Poison’ potential, ‘Graviballs’ for 25% of HP damage and the spell ‘Bio’ for ‘Poison’ damage are good here (pounding it with spells in general is recommend here)). The Zolom casts ‘Blown Away’ to remove a member and then follows with ‘Beta’ to damage the remaining combatants and end the battle.
(Cane and) Rinse and repeat with the above method and I inched my way across the Marshes to the Mythril Mine.
Normally, you go to the nearby Chocobo Farm, grab the ‘Chocobo Lure’ Materia and ride a Chocobo across the Marshes without being caught by the Zolom. However, that’s just the sensible way and we don’t do sensible here.
Battle #4 – Barret’s Duel with Dyne
A core theme in Final Fantasy is ‘tragedy’. Every character in this game has some form of loss associated with them (Red XIII – losing his father, Tifa – losing everyone in Nibelheim, Cid – Shinra taking away his dream of piloting a rocket and so on).
Barret’s backstory was tough – his wife dies, his best friend has a grudge with him and the town of Corel blames him for their misfortune. Arriving in Corel after Barret is mistaken as ‘the killer with the gun arm’ (there aren’t many people with guns for arms in FF7) in the Golden Saucer, he fights his best friend, Dyne.
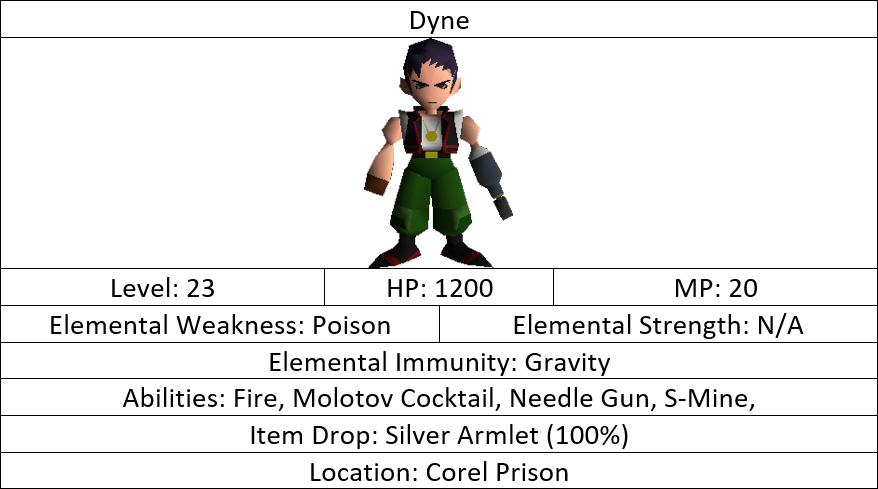
Dyne never uses ‘Fire’ in battle and all of his attacks are non-elemental. Dyne is weak to ‘Poison’ attacks.
First entering this battle, I lost, as I wasn’t equipped with the ‘Restore’ Materia or healing items. Dyne can quickly win using his ‘Molotov Cocktail’ ability.
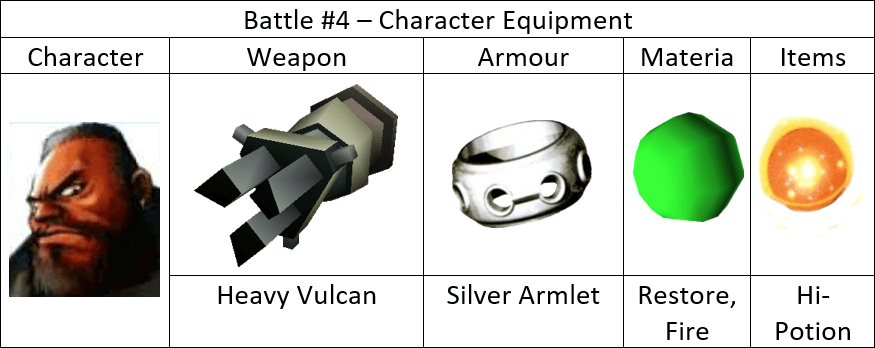
On the second time round, using ‘Restore’ and ‘Fire’ worked wonders and Dyne was quickly beaten.
Dyne’s most powerful ability is ‘Molotov Cocktail’, which is used when his HP is <50% and he has a 50% chance of using the ability before conceding defeat.
No ‘Victory Theme’ is played after the battle and neither does Barret pose. He just killed his best friend after all.
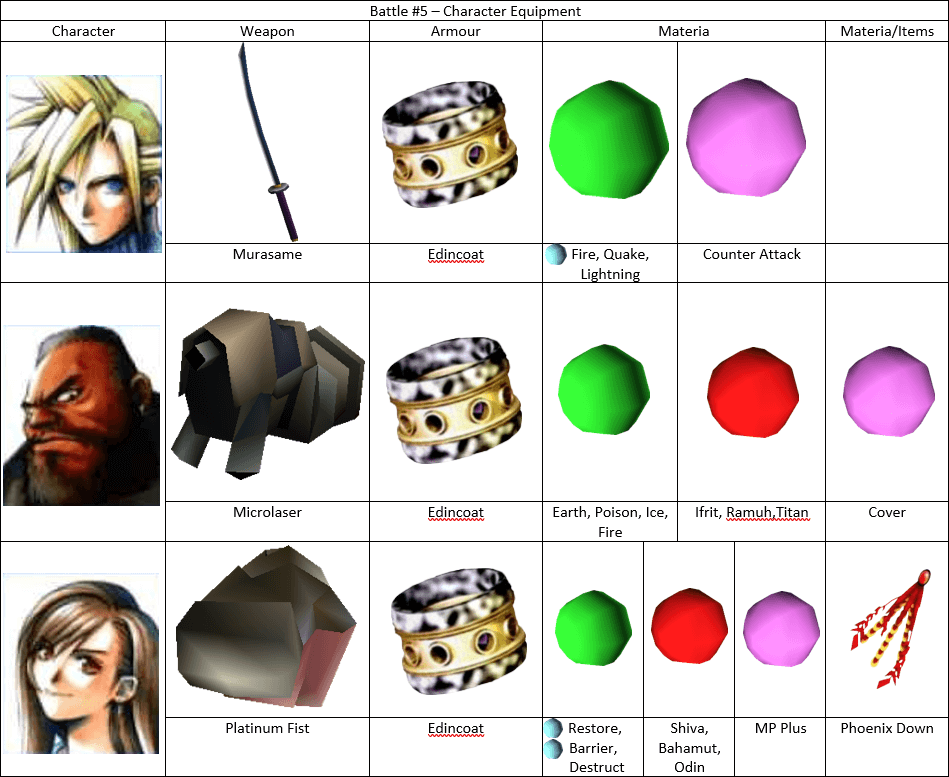
Battle #5 – Fighting Jenova?LIFE
Dying from a plunging stab from what looks like Sephiroth, Aerith is now gone and everyone is devastated. Jenova?LIFE (whom took the form of Sephiroth) has now entered the fray.
Here, Uematsu’s memorable J-E-N-O-V-A Theme is replaced with Aeris’ Theme to change the atmosphere completely. It works and it was the most depressive boss battle I have faced in a videogame.
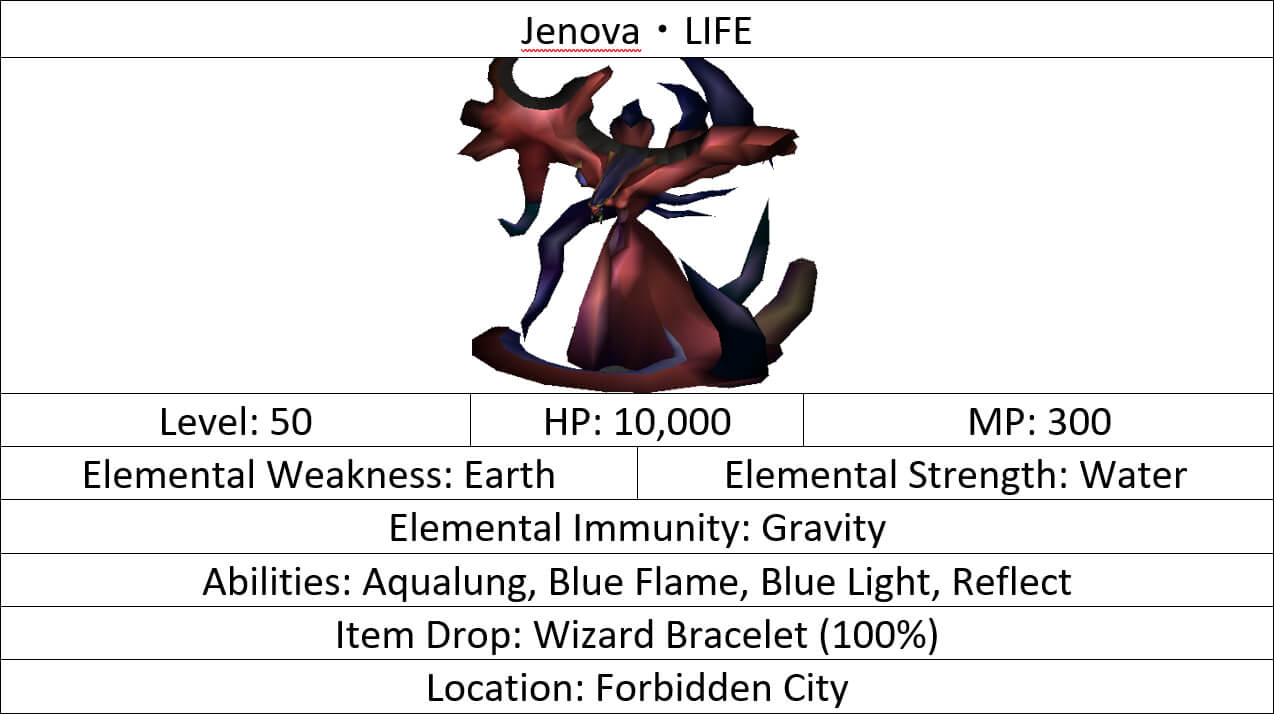
Jenova?LIFE’s ‘Blue Light’ and ‘Blue Flame’ are both ‘Water’ abilities. The latter may attack twice during one turn and the former is a stronger attack that causes ‘Water’ elemental damage.
Any magical-based attack that hits Jenova?LIFE, will cause Jenova to set up the spell ‘Reflect’, pinging back any magical attacks onto the original caster.
My party was around Level 35. I used summons, along with the spell ‘Debarrier’ to remove Jenova?LIFE’s ‘Reflect’ and ‘Barrier’ paired with the ‘All’ Materia ( ) to reduce physical damage by half to all party members and of course unleashing every Limit Break at every opportunity.
‘Cover’ was assigned to Barret to absorb attacks for lower HP members (particularly Tifa).
‘Earth’ element spells and summons such as ‘Quake’ and ‘Titan’ are effective against Jenova?LIFE.
That concludes Part 1 and I hope that you enjoyed it. There will be more battles to come in Part 2 including Diamond Weapon, Helletic Hojo and Safer?Sephiroth.
I’d love to know some of your favourites and what your preferred party build is in the comments below.


Thank you so much as always for publishing my work guys and I am always blessed to have Jay’s masterful artwork associated with it!
Thank you for writing it! Part 2 to come soon.
This was really interesting. I was surprised to see the Zolom there as I never tried to fight it this early in the game, only when I was getting the enemy skill.
When I replayed it last year I gave Cloud Counter Attack early on and built him as a tank. Towards the latter parts he was so good and Counter Attack so effective I had to take it off him to give other characters the chance to kill and level up their Limits!
Hi Seph, thank you very much for taking time out of your day to read through my article, it is very appreciated! Thank you!
I’m sure you and many others are far more knowledgeable than me with FF7 and its systems, the only reason I fought the Zolom so early on, was to try and cross the Marshes quicker and to give myself a challenge 😉 The smarter idea is to go to the Chocobo Farm first I feel 😉
Counter Attack is an awesome piece of Materia and definitely helped with some of the latest boss battles in the game. I gave mine to Barret, since he is pretty tanky and he seemed more the ‘natural tank’ if you know what I mean.