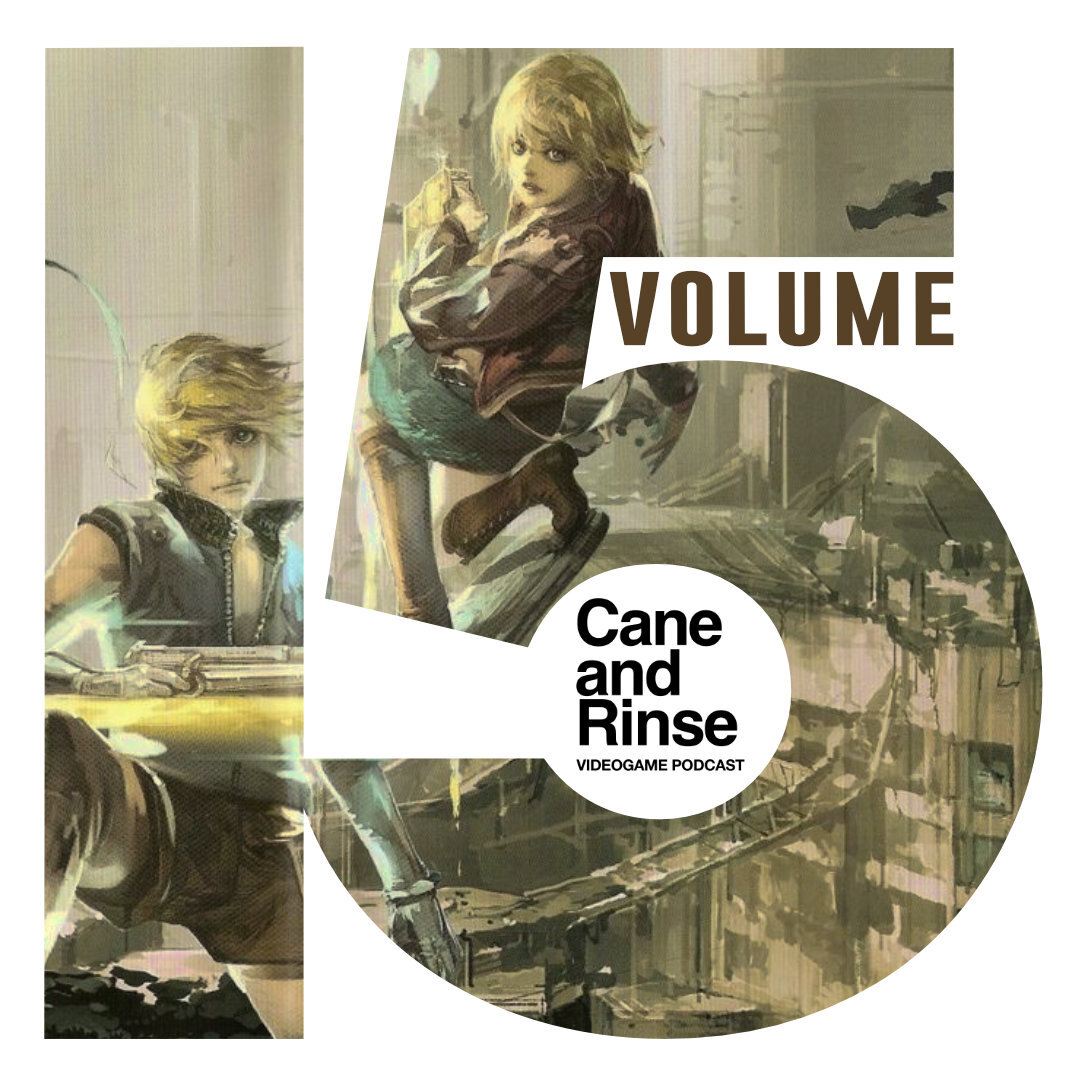
Howard van der Wal talks tactics and tells more tales from his successful Final Fantasy VII campaign
Welcome to the final part of my series of articles on my favourite battles from Final Fantasy VII. Here we’ll be covering Diamond Weapon, Helletic Hojo and Safer.Sephiroth. Again, full credit to the Final Fantasy VII Wiki and SamuraiGamers, without which none of this would have been possible.
You can find the first part of this article here.
Battle #6 – Fighting Diamond Weapon
After Cloud and co. see what happens to the White Materia in the City of Ancients as it tumbles into the water below, the planet sends out Diamond Weapon in a desperate bid to save itself from Sephiroth. As Diamond Weapon slowly makes it way to destroy Midgar, our heroes intercept it in the nick of time.
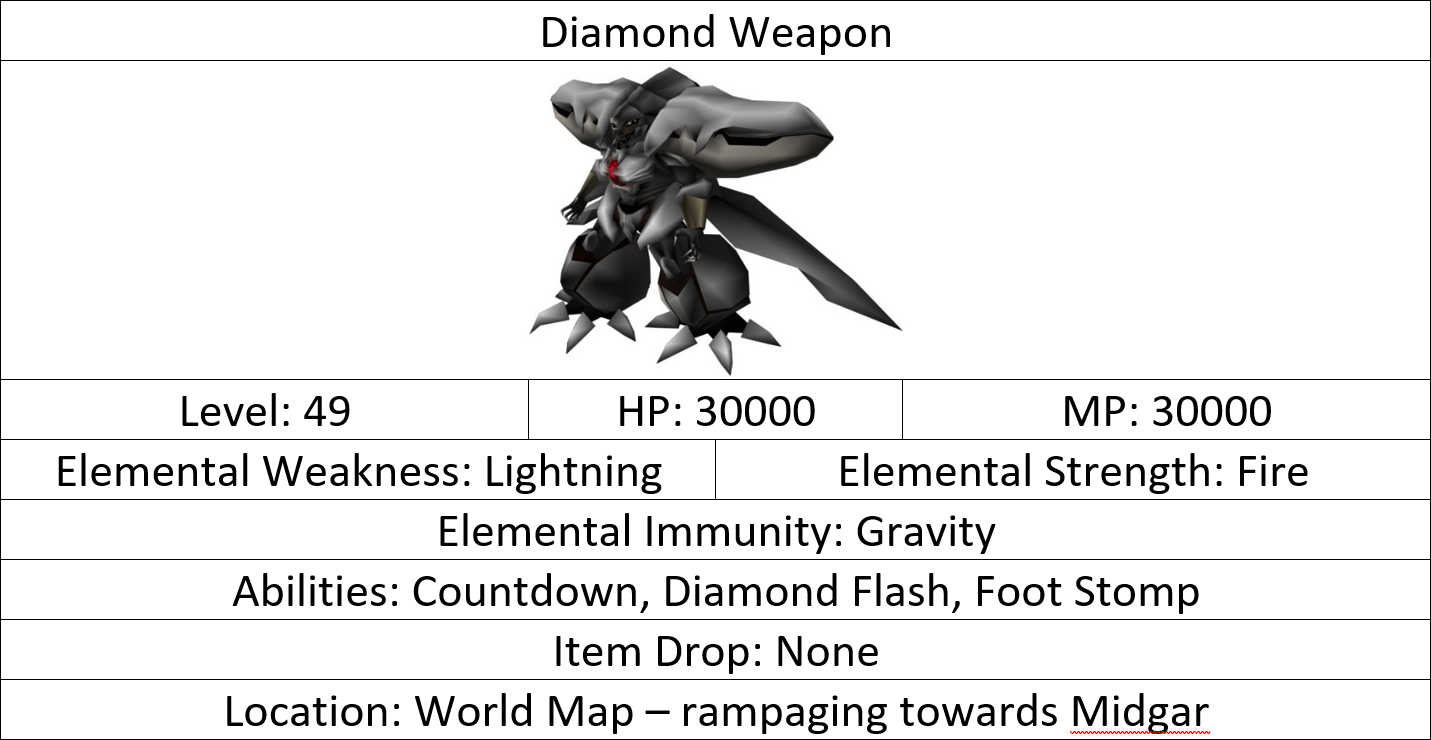
‘Foot Stomp’ inflicts large amounts of damage on one member of your party with Diamond Weapon’s foot.
‘Diamond Flash’ is a powerful laser that heavily damages all party members once ‘Countdown’ ends as well as exacting ‘Silence’, which will render your party unable to cast magic-based attacks.
‘Countdown’ (a literal countdown (not the classic British TV show), where Diamond Weapon waits three turns to charge and release ‘Diamon Flash’).
My party was at level 47 when entering the battle. By this point, they had defeated the boss ‘Demons Gate’ at the Temple of the Ancients, hence nabbing the ‘Gigas Armlet’ as well as grabbing the ‘Wizard Bracelet’ once Jenova?LIFE had been destroyed. The ‘Gigas Armlet’ gave Cloud 59 defence and with Tifa, the ‘Wizard Bracelet’ granted her eight dual Materia slots and an 85 magic defence. Tifa also got an upgrade with the ‘Kaiser Knuckle’, granting her more Materia slots (eight in total).
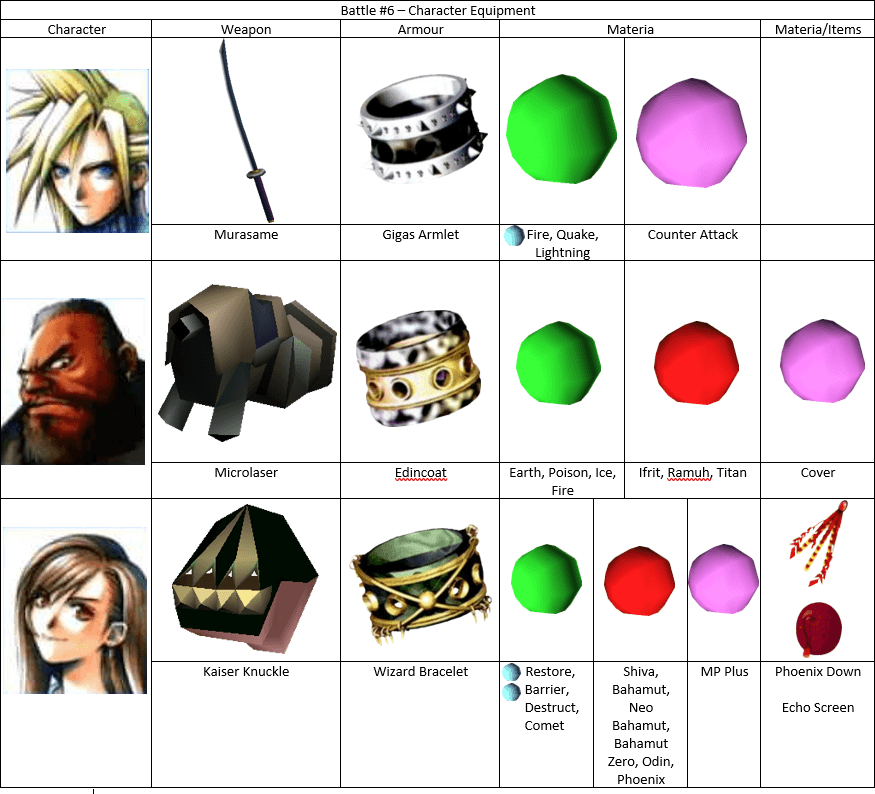
‘Echo Screens’ were necessary to cure ‘Silence’ and utilising all of my party members’ powerful level three magic, summons and healing spells.
Diamond Weapon has a quirk where it takes no physical damage, until it opens the armour around its red weak spot. Go all out when it does that with all of your available level 3 magic, summons and physical attacks and try to eliminate it before ‘Countdown’ finishes.
You are able to steal the weapon ‘Rising Sun’ from Diamond Weapon for use with Yuffie.
This is a really memorable boss fight, as I had only seen glimpses of the Weapons up till that point; not to mention raising the stakes with its doom march towards your home Midgar, as well as the cool design – kind of a mix-up between a Zeon Gundam and a chubby Evangelion.
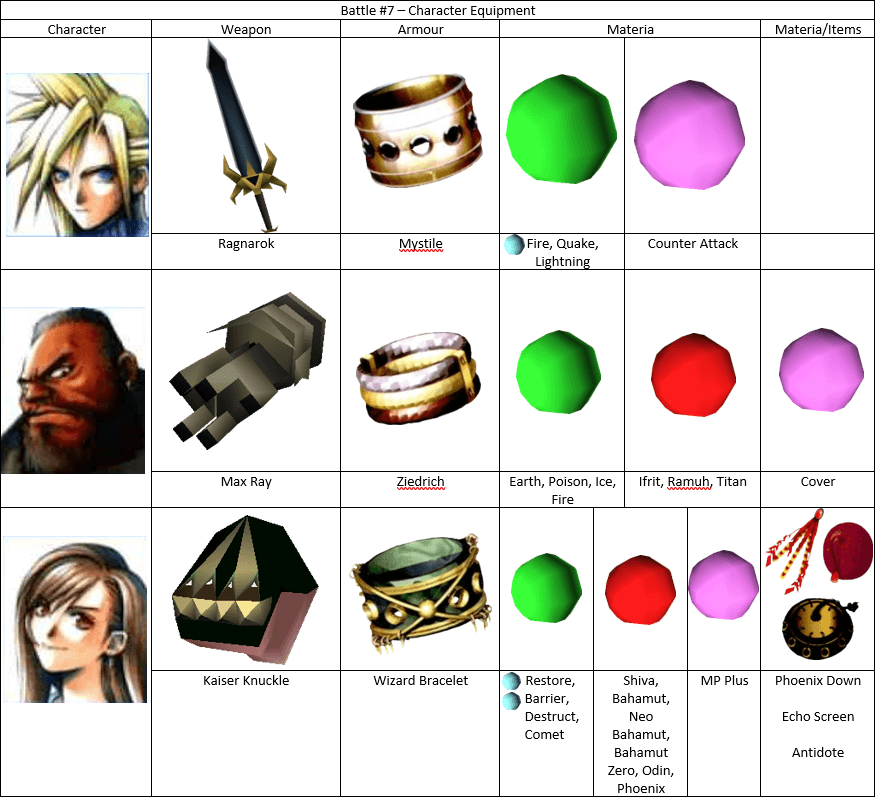
Battle #7 – The Horror of Helletic Hojo
With Diamond Weapon defeated, Cloud and his team hatch a daring plan to parachute into Midgar to stop Hojo using the Sister Ray to supply Sephiroth with Mako energy.
Everyone eventually makes it to the top of the Sister Ray to fight Hojo’s three incarnations – Hojo, Heretic Hojo and Lifeform-Hojo N. We’ll be focusing on Helletic (a mistranslation of ‘heretic’) Hojo, since the body horror aspects were the most interesting part of the boss – the design reminded me of the monsters from movies like Cronenberg’s The Fly, or 2006’s Slither.
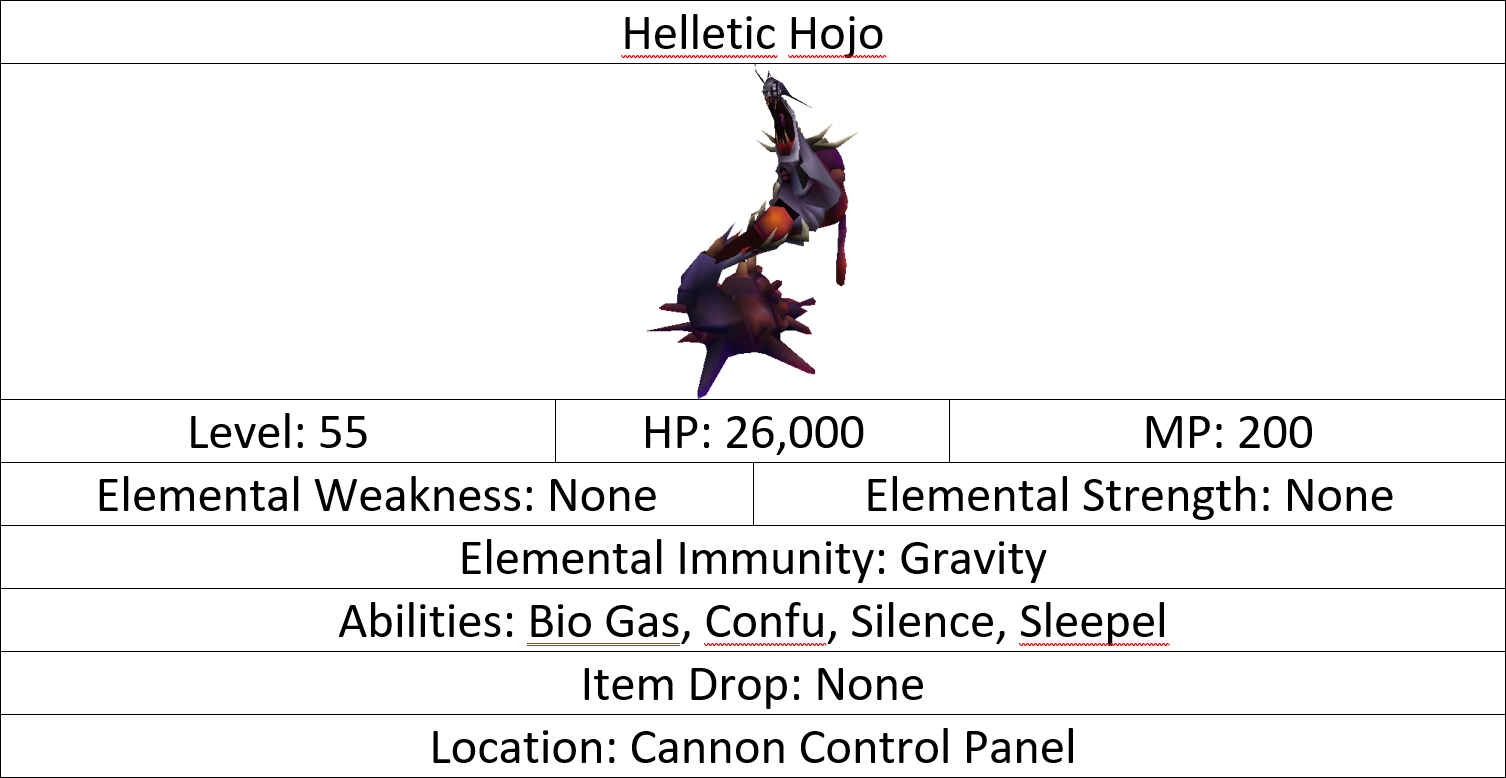
My party was around level 50 when we engaged Hojo (your characters do not level up between each phase of the fight). Hojo’s first form is pretty simple – keep wailing on him and ignore the sample enemies he spawns from his capsules.
Next, he transforms into Helletic Hojo.
He has the following abilities: ‘Bio Gas’ – damaging one opponent and poisoning them in the process.
‘Confu’ – causing the afflicted party member to spin around uncontrollably and indiscriminately attack their own party members.
‘Silence’ – as explained before, silencing one character and rendering them unable to cast magic and ‘Sleepel’ – enacting a sleep effect on the affected party member and rendering them unable to move.
Helletic Hojo has three weakpoints on his body.
The player can target his main body, as well as both left and right arms (which regenerate after 3 turns). Whichever part of him you attack, will take off health from his overall pool of HP.
For Hojo to cast ‘Bio Gas’ for example, he needs both arms, with ‘Sleepel’, it can be used after both arms are destroyed.
Before the battle, I equipped Cloud with the ‘Ragnarok’ sword, dropped from the boss ‘Proud Clod’, giving him 97 attack damage along with the armour ‘Mystile’ – found in Midgar Part 2 and offering a good 65 defence bonus.
Barret was given the ‘Max Ray’, discovered in Midgar Part 2 for a not-to-be-sniffed-at 97 attack damage (I foolishly never picked up Barret’s ultimate weapon ‘Missing Score’, which you can find in a treasure chest just before the Sister Ray fight with Hojo).
Barret’s armour was the ‘Ziedrich’; this is a bangle offering the user 100 defence and halving the effect of all elemental attacks – good for Barret when using the independent Materia ‘Cover’ for tanking some damage for other members.
Tifa kept her ‘Kaiser Knuckle’ and ‘Wizard Bracelet’, due to her later weapons including the ‘Master Fist’ and ‘Premium Heart’ do not have as many Materia slots.
On to the battle. As long as you keep Helletic Hojo’s arms out of action to stop him using his abilities on top of administering plenty of ‘Echo Screens’ and ‘Antidotes’ to remove status effects and ‘Cure3’ for healing, you can win the battle.
Any characters that become ‘confused’ should not attack, otherwise you could unwittingly unleash a summon on one of your party members. Aside from that, keep hammering at Helletic Hojo and his second form soon crumbles.
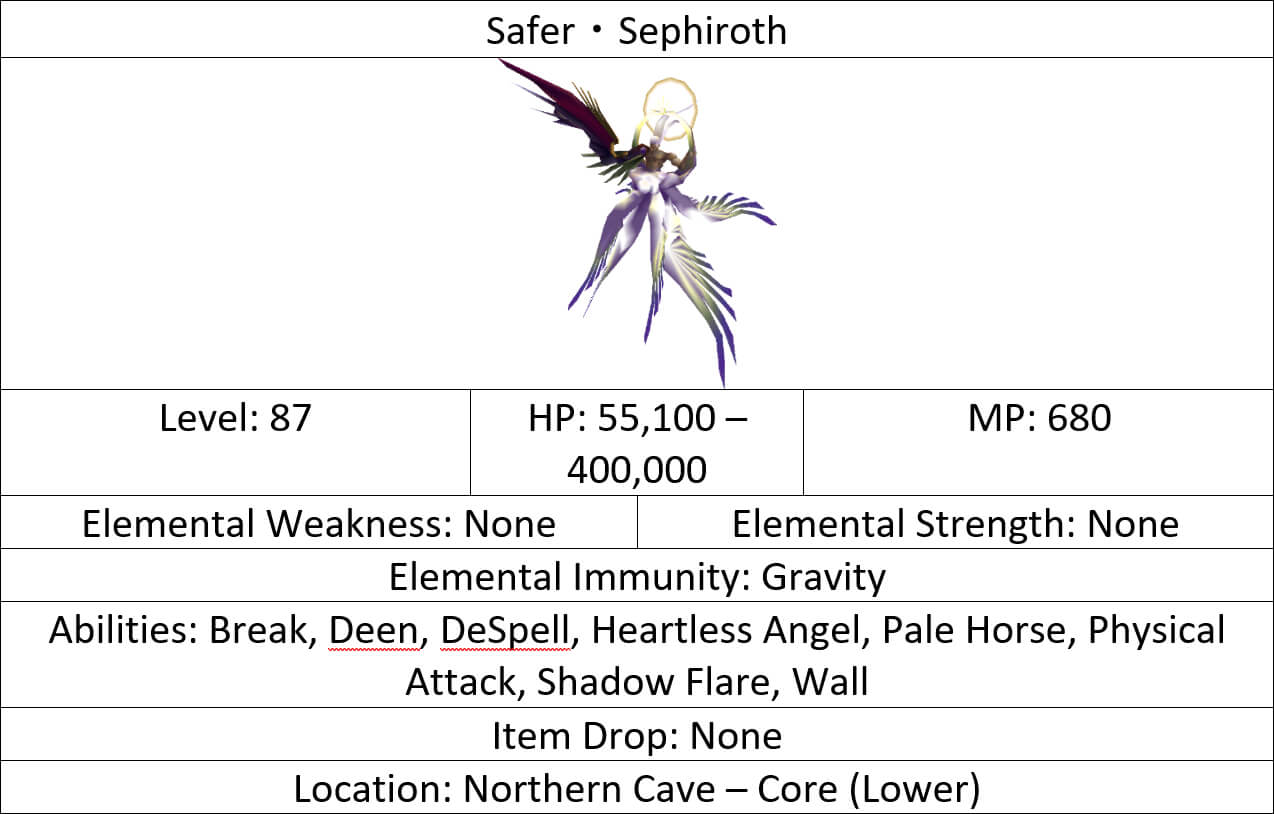
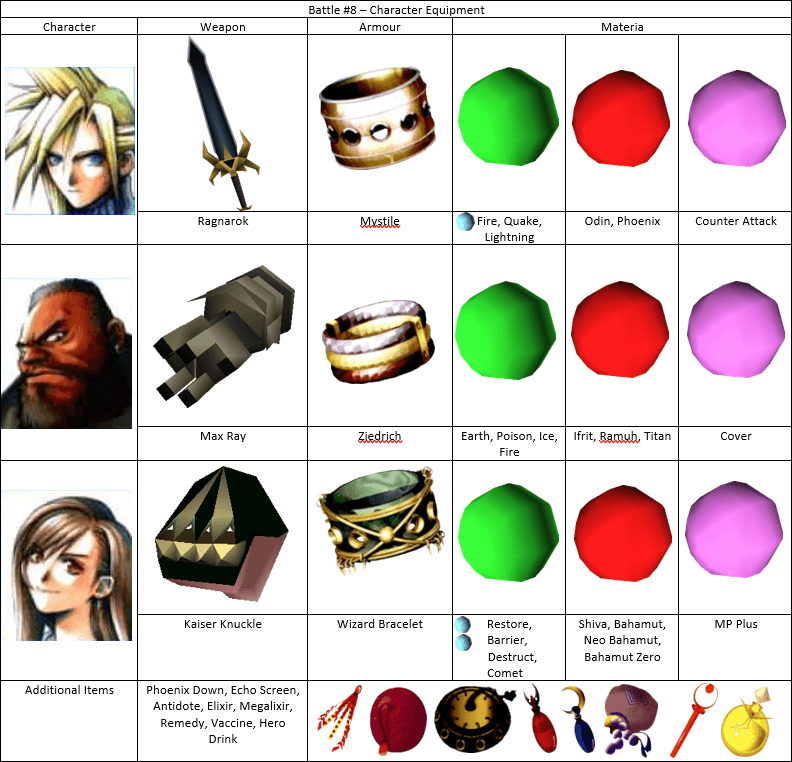
Battle #8 – The One-Winged Angel – Safer.Sephiroth
The penultimate battle and the man everyone has been wanting to see. Safer.Sephiroth enters the stage.
By this point, the player has jumped into the North Crater and has gone through a gruelling gauntlet of tough enemies and bosses to get to this point.
This fight has a form of dynamic scaling difficulty – depending on what the player does in previous battles or what their level going into the fight is, determines the stats that Safer.Sephiroth will have.
All player characters at level 99 provide Safer.Sephiroth with a 30,000 HP (among other stat areas) boost.
In the previous boss battle (Bizarro?Sephiroth), when Bizarro?Sephiroth’s ‘Core’ (i.e. his head) is destroyed, it buffs Safer.Sephiroth’s HP every time by 100 points, to a maximum of 24,900 HP.
If you cast the summon ‘Knights of the Round’ on the boss Jenova?SYNTHESIS, Safer.Sephiroth then picks up a cool 80,000 HP (he was probably annoyed at the player going a little overkill on his mother).
Safer.Sephiroth
Coming into this battle, all of my characters were around level 60. Weapons, armour and Materia were exactly the same as before, albeit with a greater distribution of summons amongst the team to reduce the negative Max HP status effect.
On to Safer·Sephiroth’s abilities (what is so ‘Safe’ about this guy anyway)?
‘Break’ is an Earth-elemental magic attack with a 32% chance of inflicting the ‘Petrify’ status effect (Safer.Sephiroth casts this when above 25% HP).
‘Deen’ inflicts non-elemental magic damage onto all characters and ‘DeSpell’ will remove any defensive magic the player has set up including ‘Barrier’, ‘Reflect’ and so forth.
‘Heartless Angel’ shows up to ruin your day and reduce each party members’ HP to 1 (Sephiroth will cast this when under 25% health).
‘Pale Horse’ hits a single opponent with a magic attack and dispenses the status effects of ‘Frog’, ‘Sadness’ and ‘Small’.
‘Shadow Flare’ causes a large amount of magical damage to one opponent.
‘Super Nova’ hits all opponents with simply ridiculous damage (93.75% of their HP vanishes) and may inflict ‘Confuse’, ‘Silence’ or ‘Slow’ on them.
Finally, ‘Wall’ is erected to half the damage taken from physical and magical attacks.
Safer.Sephiroth will also fly higher into the air for a short period, rendering any short-range attacks (of course any ranged characters have no issue) nullified, so this is an excellent time to use any ranged magic or summons.
I stayed up all night, had about an hour’s sleep and played again in the morning in order to beat this boss. Every time you die, you are forced to go through the prior enemy and boss gauntlet.
To keep things simple, I would cast ‘Wall’ on all characters to give them defence against physical and magical attacks. Next, the item ‘Vaccine’ was applied to each character to protect them from transformations (turning into a frog) mid-battle and a swig of the ‘Hero Drink’ is also taken to raise the Strength, Magic, Defence and Spirit levels of a character by 30%. After that, ‘DeBarrier’ is cast to remove Safer.Sephiroth’s ‘Wall’ status effect.
It is at this point Sephiroth starts or has already been pounding you with his attacks, notably ‘Heartless Angel’ and ‘Super Nova’, outright killing my party many times.
Through careful item usage, constantly healing every character with ‘Cure3’, keeping my physical and magical barriers raised with ‘Wall’ and unleashing a summon or level 3 magic if I was feeling brave enough, Safer.Sephiroth was taken down with a huge sigh of relief.
This boss is so memorable, mainly due to the angel aesthetic design and ‘Super Nova’ – for me being one of the coolest attacks in a game, along with the accompanying two minute cutscene. Special mention should also be made to the epic One-Winged Angel by Nobuo Uematsu.
Well, that wraps up my two-part series on my favourite bosses. I had so many more bosses I wanted to talk about, however the articles would have been infinitely longer, so I narrowed it down to my absolute favourites.
Thank you so much for taking the time to read my article and I would love to know your favourite Final Fantasy VII boss battles, what equipment you used and the strategies implemented to beat them in the comments below.


Thank you very much for uploading Part 2 guys, really appreciated as always!